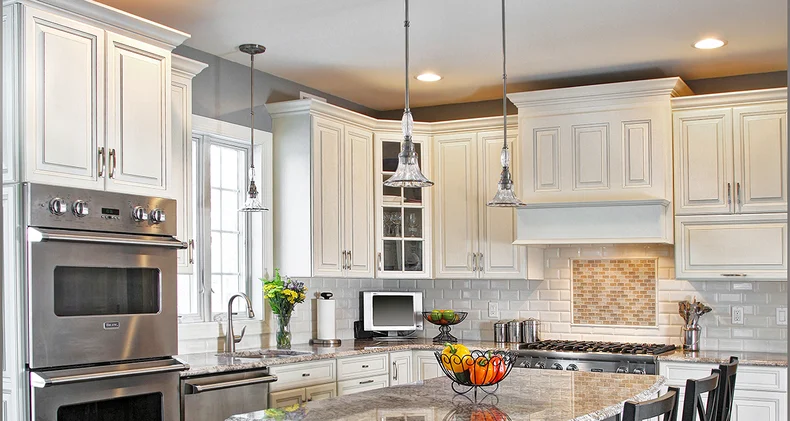
Crown Molding for Cabinets Enhancing Your Kitchen Design
Crown molding is a popular design element used to elevate the aesthetic appeal of various spaces in the home, particularly in kitchens. While crown molding is traditionally used for ceilings, crown molding for cabinets offers an excellent way to add sophistication and style to your cabinetry. Whether you’re remodeling your kitchen or just looking to update your existing cabinets, adding crown molding can bring a touch of elegance and visual interest.
In this guide, we’ll explore the benefits of adding crown molding to cabinets, how it enhances kitchen design, and tips for installation.
🎨 Why Add Crown Molding to Cabinets?
1. Enhanced Aesthetic Appeal
Adding crown molding to the top of your cabinets creates a polished and finished look, transforming plain kitchen cabinets into a high-end focal point. Whether your kitchen has a traditional, modern, or transitional design, crown molding can seamlessly complement the overall aesthetic. It gives your cabinetry a luxurious touch, making the space feel more refined.
2. Conceals Gaps and Imperfections
Over time, walls and cabinets may settle or shift, creating unsightly gaps between the cabinet tops and the ceiling. Crown molding acts as a perfect solution for concealing these imperfections, providing a neat and cohesive look. It also helps hide uneven ceiling lines, which are common in older homes.
3. Customization and Style
Crown molding offers a wide variety of styles, from classic to contemporary, allowing you to choose the design that best matches your kitchen’s character. Whether you prefer intricate detailing or a clean, modern look, there’s a crown molding option for you. You can also customize the molding with different paint finishes or wood types to match your cabinets and overall decor.
4. Added Value to Your Home
Investing in crown molding for your cabinets not only enhances the visual appeal of your kitchen but can also increase the resale value of your home. Prospective buyers often appreciate the attention to detail and aesthetic improvements that crown molding adds to the space, making it a wise investment in the long run.
🔨 How to Install Crown Molding on Cabinets
Installing crown molding on your cabinets might seem intimidating, but with the right tools and technique, it can be a straightforward process. Here’s a step-by-step guide to help you achieve professional results.
Step 1: Measure and Plan
Start by measuring the top perimeter of your cabinets where you’ll be installing the molding. Take accurate measurements, and decide whether you want to install the molding on just the upper cabinets or on both the upper and lower cabinets for a more dramatic effect.
Step 2: Choose the Right Molding
Select the style and material of the crown molding that suits your kitchen design. Wood moldings are classic and work well with traditional or rustic kitchens, while MDF (medium-density fiberboard) or polyurethane moldings are more affordable and perfect for modern designs. Consider the scale of your cabinets—larger kitchens may benefit from taller, more ornate molding, while smaller kitchens look great with smaller, simpler profiles.
Step 3: Cut the Molding
Use a miter saw to cut the molding to the correct length. Angle your cuts (usually 45 degrees) to ensure the pieces fit together at the corners. If you have angled or curved walls, you may need to make special adjustments for a snug fit.
Step 4: Attach the Molding
Apply a strong adhesive to the back of the molding and press it firmly against the top of the cabinets. You can also use small nails or a brad nailer for added security. Make sure the molding is level before securing it fully. If necessary, use wood clamps to hold the molding in place while the adhesive dries.
Step 5: Fill Gaps and Paint
After attaching the molding, fill any gaps between the wall and the molding with caulk or wood filler. This ensures a seamless appearance. Once the filler is dry, sand it down for a smooth finish. Finally, paint or stain the molding to match your cabinets. You can use high-quality paint or wood stain for a professional look.
🌟 Tips for a Successful Installation
1. Use a Level
Ensure that your molding is installed evenly by using a level. This will prevent your molding from appearing crooked or uneven when installed.
2. Pay Attention to Scale
When choosing crown molding, make sure that the size and style complement the proportions of your cabinets. Oversized molding can overwhelm smaller cabinets, while thin, delicate moldings can look out of place on larger cabinets.
3. Consider Lighting
Crown molding can also serve as a frame for lighting. Consider installing under-cabinet lighting or LED strip lights around the perimeter of the cabinets to create a stunning, ambient effect.
4. Opt for Pre-Finished Molding
If you want to save time on the finishing process, consider purchasing pre-finished crown molding. This will save you the hassle of painting or staining the molding after installation.
💡 Final Thoughts
Adding crown molding to cabinets is an excellent way to enhance the overall design and value of your kitchen. It’s an affordable and easy upgrade that can create a more polished, cohesive look without requiring a complete remodel.
Whether you’re going for a traditional, contemporary, or transitional style, crown molding can be customized to fit any aesthetic, helping your kitchen become a beautiful and functional space.
Would you consider installing crown molding on your kitchen cabinets? Let us know how you would use this simple design element in your kitchen transformation! ✨🍴